Most garages do not have a tool problem. They have a putting-tools-away problem. A rolling tool cart setup only works when putting a tool back is easier than setting it down, and if that is not true, you will set it down. By Saturday afternoon the top of your cart looks like a swap meet and the sockets are back in a coffee can.
I have been setting up tool storage for myself, for the guys in my bay, and for every friend who bought a starter set and then asked me where the 10mm lives. The cart is the easy part. The layout is the part people skip, and it is the reason a cart that costs real money ends up as a shelf with wheels and a layer of shop towels on top.
Here is the order I do it in, from the floor dump to the 30-day audit.
Why you should trust me
Sixteen years as a diesel mechanic in Columbus, Ohio. My home shop started as one toolbox and metastasized into three, plus a cart that follows me around the garage like a dog. I have organized storage for coworkers, for friends, and for one patient neighbor who kept his sockets in a bucket.
I test tool storage the way a shop uses it: loaded drawers, shut hard, day after day, and the three-shift test where tools actually have to go back where they belong at the end of a job. I keep a caliper in my pocket and I have opinions about drawer slides that could start a fight at a parts counter.
What you need before you start
Two pieces of gear, and you may not own either. A mobile base with real drawers, and a bin system that gives small tools a fixed home inside those drawers. Everything else in this guide you can do with tape, a marker, and a free afternoon.
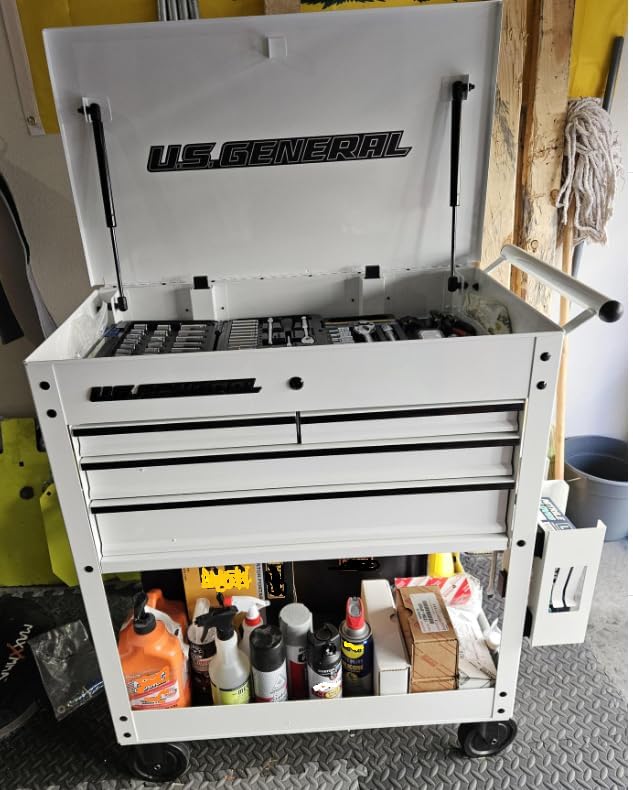
The foundation: U.S. General 30 in. Tool Chest 4-Drawer Tech Cart, White
 Visit on Amazon →
This is the base of the whole setup. Thirty inches wide, four drawers, white, and a cart format, which matters more than people give it credit for. The reason a cart beats a stationary chest for this kind of work is that the storage comes to the job. You roll it next to the truck, you work out of it, you roll it back. Nothing gets set down on a fender because the box was ten feet away.
Four drawers is not a lot of drawers, and that is the point. A short drawer stack forces you to decide what actually belongs in the cart. I have watched guys fill an eight-drawer chest with three drawers of tools and five drawers of junk, and they still cannot find a 3/8 extension. Fewer drawers, better decisions.
The white finish is a shop decision, not a style one. You can see grease on it, which means you wipe it. A dark box hides the mess until the mess becomes a permanent feature.
If you are upgrading from a plastic tray or a bucket, this is where the upgrade starts. You cannot organize drawers you do not have.
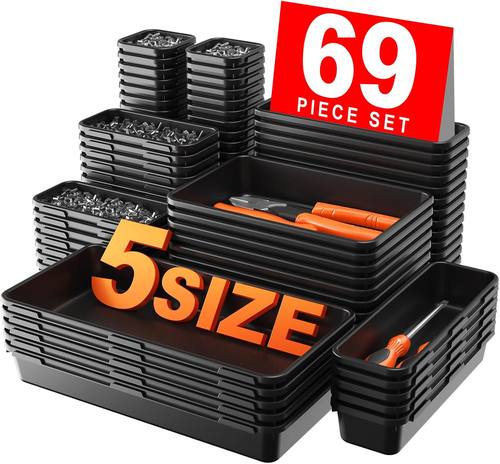
The bin system: A-LuGei 【𝗠𝗶𝗹𝗶𝘁𝗮𝗿𝘆 Grade】 Tool Box Organizer Garage Organization
 Visit on Amazon →
Drawers hold volume. Bins hold order. That is the whole reason this organizer belongs in the plan. A drawer full of loose sockets, extensions, hex keys, and one stray cotter pin is not storage, it is a junk drawer with a handle. Drop a divider system into that drawer and every tool has a home, the drawer still shuts when you shove the cart, and you stop buying the same 10mm twice a year.
A bin system has to be sized to the drawers you own and to the groups you actually use. Buy bins before you have sorted your tools and you end up with forty little compartments holding one socket each. Sort first, count the groups, then set the dividers to match.
This style of organizer earns its spot with the small stuff that goes missing. Bits, drill indexes, cotter pins, fuses, the hex keys that come with everything and fit nothing. The stuff that ends up in a coffee can is exactly the stuff that needs a bin.
How I judge a cart and a bin system
I will be straight with you. I am judging these two pieces on the same checklist I run on anything that comes into my bay, not on three months of shop abuse, because they have not been in my bay for three months. Here is the checklist, and you should run it too.
Open the drawer. Feel the slide. If it grinds, walk away. Ball bearing slides or nothing. That is not a preference, it is the difference between a cart you use and a cart you fight.
Push the drawer shut with two fingers. If it sticks or needs a shoulder, it is going to be worse when that drawer is full of sockets.
Look at the drawer bottom. Weight ratings are measured with the load spread evenly, and a drawer of sockets is not spread evenly. A thin drawer bottom sags in the middle, then the drawer starts rubbing the frame. If you can flex the bottom with one hand, plan on spreading heavy tools across the lower drawers.
Roll it. A loaded box with bad casters is a stationary box with extra steps. Locking casters are not a feature, they are a requirement, and you want all four to lock, not three.
Bin systems get a different test. Set the dividers, load them, close the drawer, roll the cart over a seam, and open it again. If the bins went on a field trip, they will be a mess within a week. Fit matters more than compartment count.
The setup workflow
Now the actual work. Set aside two hours and do it in this order.
Step one: The floor dump. Empty everything onto a sheet of cardboard on the floor. Every tool, every bit, every mystery bracket. You cannot organize what you cannot see, and you will find two 10mm sockets, a wrench you forgot you owned, and a receipt from 2019.
Step two: Sort by job, not by tool type. Everyone starts by making a pile of screwdrivers, a pile of pliers, a pile of sockets. That is the wrong unit. Sort by the job: brake work, electrical, suspension, oil changes, and the catch-all. When you are under a truck with one hand free, you are not thinking "I need the pliers pile." You are thinking "I need the brake tools." Build drawers around the thought you actually have.
Step three: Assign drawers on paper before you load anything. Write the group on a strip of masking tape and stick it to the drawer front. Live with it for a day before you commit. Rearranging tape is free. Rearranging a loaded drawer is a project.
Step four: Weight the bottom, feather the top. Heavy groups go low: sockets, hammers, the big wrenches. Light groups go high: electrical, bits, the odd hardware. This is about the cart's center of gravity as much as your back. A cart with all the weight in the top drawer tips when you roll it over a floor seam and you find out the hard way.
Step five: Build the bins before you build the drawer. Take the divider system to the bench and set it up next to the group it is going to hold, not inside the cart. One bin per group of small parts. If two bins hold the same thing, you have too many bins. If one bin holds six unrelated things, you have too few compartments.
Step six: Decide what lives on top. The top of a cart is prime real estate and it is where clutter collects first. Pick three things that earn the spot: the tool you reach for most, whatever can you are currently using, and a rag. Everything else goes in a drawer. If the top is full, the layout is wrong.
Step seven: Label the outside of the drawer, not the inside. Labels go on the drawer front where you read them standing up, facing the cart. A label inside the drawer only helps after you have already opened the wrong one.
Step eight: Run the 30-day audit. For one month, do not reorganize. Watch what you reach for and where you hesitate. Then move the two or three things that keep ending up in the wrong drawer. The setup that survives is the one that matches how you actually work, and you only learn that by working.
The mistakes that kill a cart setup
Friction slides. In year two you are pulling drawers with both hands and swearing at a box that cost good money. Skip anything that describes its slides as friction, or "smooth gliding" without saying ball bearing.
Overflow drawers. The drawer you did not assign becomes the drawer where everything goes. When you find yourself opening it first, your other drawers are wrong. Fix the layout, do not add a drawer.
Bins that travel. Dividers that are not sized to the drawer turn into loose parts the first time you roll across a threshold.
One-wheel locks. A cart that locks on three of four wheels still rolls when you lean on it, and that is how a drawer ends up open with a socket set on the floor.
Doing it all in one sitting. The floor dump and the paper layout are one session. The loading, the bins, and the audit are another. Rush it and you rebuild it in a month, which is exactly what I did the first time.
What this all costs
The math here is simple and it is not about the number on the tag. Compare what a cart and a bin system cost against what you keep replacing because you cannot find it. A socket set, three tape measures, a pair of dykes, and the 10mm sockets that vanish every six months. Then add the minutes you spend digging through a coffee can while a job sits half finished. It gets silly fast.
A cart that organizes a whole shop of tools is the best value in the garage. A bin system that costs less than a set of cheap wrenches is the second best. You do not need the biggest box on the shelf. You need drawers that slide with one hand, a home for the small stuff, and a layout you will actually maintain after the novelty wears off.
Do the floor dump this weekend. Your 10mm is in there somewhere.