A wall mount tool organizer fails for one of two reasons. Either it pulls out of the wall, or the tools never go back on it. The first problem is anchoring. The second problem is layout, and it is the one most people never solve, because they hang the rack before they decide what lives where.
I have lived through both failures in my own garage. Sixteen years as a diesel mechanic, three toolboxes at home, and a wall that has been re-drilled more times than I want to admit. The rack I bolted up in the wrong spot years ago is still there, holding a broom, because that is all it was ever good for.
This is the process I use now. Clear the floor, measure the wall, find the studs, pick the rack that matches the tools, hang it once, and leave it alone.
Why you should trust me
I fix diesel trucks for a living and I organize tool storage for fun, which tells you something about my social life. I have set up shop storage for coworkers, for apprentices, and for friends who bought a starter set and then called me at 9 p.m. because they could not find a 10mm socket.
My standard is not "does it look organized on day one." It is "does it still work on day ninety, after three shifts a week of tools coming off and going back on." That is the test that separates a rack that helps you from a rack that becomes another horizontal surface.
I care about the boring parts: what the wall is made of, where the studs are, and whether putting a tool away is faster than dropping it on the bench. If it is not faster, the rack loses.
How I picked and how I tested
This guide is not about which rack to buy. It is about how to hang whatever you buy so it survives. The two racks below are the ones I would start with for a typical two-car garage, because between them they cover the two categories of tool that eat the most floor space: power tools and long-handle yard tools.
The way I judge any wall rack comes down to four questions. What does it mount to, and is the mounting hardware honest about it? Does the rack flex when you load it, or does it hold its shape? Can you reach the thing you use most without moving three other things? And does the rack tell you where a tool goes, or do you have to invent that yourself every time?
The category splits cleanly. Power tools are short, heavy, and dense, and they need shelves or slots with a lip so a drill does not roll off. Long-handle tools are light but awkward, and they need hooks or a cradle that keeps a rake from swinging into your shins. Buying one rack to do both jobs usually means doing neither job well.
The two racks I would hang first
Both of these are wall-mounted steel, both go into studs, and both solve a specific problem. Pick the one that matches the pile on your floor.
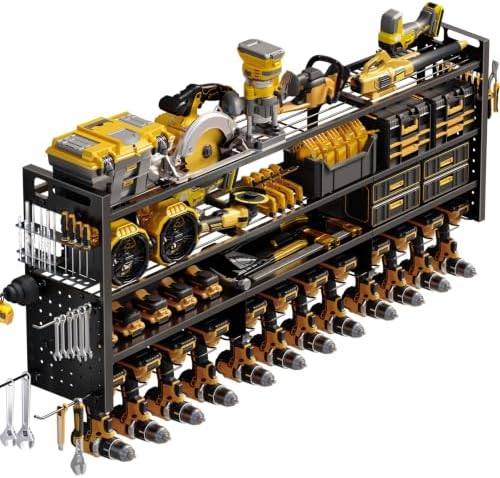
The power tool rack: Large 49'' Wide Power Tool Organizer Wall Mount, 4-Tier
 Visit on Amazon →
Four tiers across a 49-inch span is the right shape for a wall of drills, impacts, chargers, and batteries. The width is the part that matters. A narrow rack forces you to stack tools on top of each other, and stacking is how a shelf becomes a junk pile. Spread them out and each tool has a lane.
This is the rack I would put at chest height, close to the outlet, so chargers live on one tier and the tools that feed them live on the next one down. Batteries are the heaviest small item in most garages, so they go low, not up top. Treat the upper tiers as the light stuff: drivers, tape, a tray of bits.
Flaws but not dealbreakers: A four-tier rack is only as good as the wall behind it. On a 49-inch span you want at least two studs, ideally three, and a level line drawn before you drill the first hole. Get that wrong and the tiers will not sit parallel, and you will notice it every single day.
Anyone whose floor is currently covered in cordless tools and charger bricks will get the most out of this one.
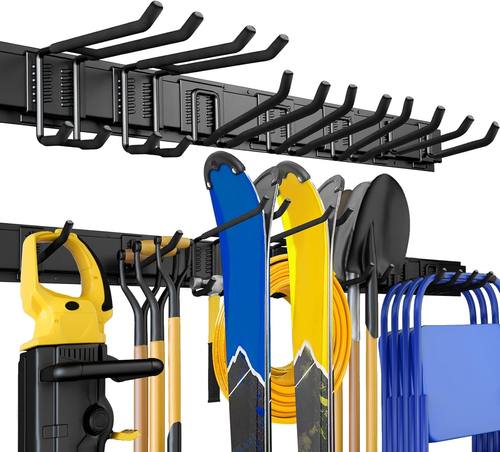
The long-handle rack: UUP 48" Garage Tool Organizer Wall Mount, 440lbs Garden Garage Storage Garage Organization with Adjustable Heavy Duty Hanging Hooks, Yard Rack Hanger System Shovel Rake Broom Ladder Holder, Men Gift
 Visit on Amazon →
This is the rack for shovels, rakes, brooms, and ladders. The maker rates it at 440 pounds, and adjustable hooks are the feature that earns that number, because a fixed hook spacing never matches what you actually own. You move the hooks to the tool, not the other way around.
Long-handle tools are the worst offenders for floor clutter because they are tall, thin, and impossible to lean anywhere without falling over. Once they are off the floor, the whole garage reads differently, and you stop tripping over a rake handle on your way to the freezer.
A word on that rating, because this is where people get burned. A capacity number assumes a solid mounting surface and a load spread across the rack. Hanging a 60-pound ladder on one end of any rack is a lever, not a load, and levers pull fasteners out of drywall. Distribute the weight and put the heaviest items over a stud.
Flaws but not dealbreakers: Hooks that hang tools by the handle mean the tool dangles. That is fine for a broom and slightly annoying for a heavy shovel head, which wants to swing. Hang the heaviest long-handle tools closest to the stud line so the rack is not fighting torque all day.
Anyone with a yard, a ladder, and a garage floor they would like to see again should start here.
Plan the wall before you drill
This is the step everyone skips, and it is the reason racks get re-hung. Spend fifteen minutes with a pencil.
Empty the zone. Pull everything off that wall and pile it on the floor in the middle of the garage. You cannot plan around clutter you are standing in.
Group by frequency, not by category. Tools you touch every week go at waist to chest height. Tools you touch twice a year go high. Tools that are heavy and rare go low, because lifting a case off a high shelf is how backs get hurt.
Draw the zones with painter's tape. Tape a rectangle for each rack on the wall, stand back, and look at it. It costs nothing and it catches the mistake of hanging a rack where a door swings or where the car mirror will hit it.
Check for what is behind the wall. Outlets, plumbing, and the garage door track all live in the same space you want to use. Kill the breaker if you are anywhere near wiring, and do not drill into a wall you have not looked behind.
The actual install workflow
Once the wall is planned, the hanging goes fast. Do it in this order.
Step one: find the studs. Use a stud finder and confirm each one with a thin finish nail. Stud finders lie near outlets and in walls with metal lath. Confirm before you commit.
Step two: mark a level line. Mark the height of the rack's top edge on each stud, then connect the marks with a level. Every rack I have seen hung crooked was hung by someone drilling one hole, then eyeballing the rest.
Step three: pre-drill. Drill pilot holes slightly smaller than your lag bolts. In a garage, bolts beat screws for anything holding weight, and the pilot hole keeps the stud from splitting.
Step four: mount into studs or a backer. If your studs do not line up with the rack's mounting holes, cut a plywood backer, screw that into the studs across three or four points, then mount the rack to the backer. This is the fix for almost every "the holes do not match my studs" problem, and it spreads the load better than any anchor.
Step five: check the fasteners after loading. Put the tools on, then put a hand on the rack and push down and out. Any movement means something is loose. Re-torque the bolts and check again. Do this again after a month, because wood moves with the seasons.
Step six: load bottom-heavy. Heavy items on the lower tiers, light items up top. This is not aesthetic advice. A top-heavy rack is a rack that wants to rotate off the wall every time you yank a tool off it.
Step seven: give every tool a home and label it. A hook with no assigned tool becomes a hook for whatever is in your hand. Label the lanes with tape or a marker. It feels fussy for a week and then it becomes the reason the rack still works in month six.
Step eight: put the rack near the door you use. The single biggest predictor of whether tools go back is how many steps it takes to put them away. A perfect rack on the far wall loses to a messy bench by the door every time.
What this costs
Both racks are wall-mounted steel in the same general price band, and both replace floor space rather than adding it. The rack itself is the cheap part. The fasteners, a plywood backer, and a stud finder you may not own yet are the rest of it, and all three are worth buying once.
Check current Amazon price on both and pick based on what is on your floor right now. If it is cordless tools, take the four-tier power tool rack. If it is a rake, a broom, and a ladder, take the long-handle rack.
The math that matters is not the receipt. It is that a wall mount tool organizer turns a 4-foot-by-8-foot patch of wall into storage you already paid for, and the only ongoing cost is the ten seconds it takes to hang a shovel back up instead of leaning it against the wall. Do that part and the rack pays for itself in a season. Skip it and you have drilled holes in your garage for nothing.