Every shop I walk into has the same disease, and it is not a shortage of tools. It is a bench buried in tools that technically have a home somewhere, just not one that is easier to reach than simply setting the tool down. Wall tool storage is the cure, but only when it is set up so putting a tool away costs less effort than leaving it out. That is the entire design brief, and almost every rack on the market ignores it.
I am Ray. Sixteen years as a diesel mechanic, home shop in Columbus, Ohio, and a storage habit that started with one toolbox and metastasized into three. I have hung racks on block walls, on drywall over 1950s studs that were closer to kindling than lumber, and on one garage wall that turned out to be furring strips over brick. I have also watched a lot of friends buy a starter tool kit, use it twice, and lose half of it to a junk drawer within a month.
This guide is about the two pieces that make wall tool storage actually work: a rack that gets the long and awkward stuff off the floor, and a case-based kit that keeps the small stuff grouped so nothing drifts loose. Then the steps to hang it and keep it working.
Why you should trust me
I have been the guy coworkers call when they buy a house with a garage and no idea where anything should go. That is sixteen years of real shop use, not a weekend of staging photos. My own boxes get opened and closed every single day, the drawers get slammed, and the tools either come back to their spots or they end up in a pile on the bench that I have to clean up before I can start the next job.
The reason I care about wall storage specifically is that it is the cheapest fix in the entire shop. You can spend real money on a chest with good slides, and you should, but the chest only solves the tools that fit in a drawer. Brooms, mops, squeegees, long pry bars, extension poles, and the shop vac hose never fit in a drawer, so they live on the floor until somebody hangs them.
How I picked and how I tested
The gear below is not about which chest to buy. It is about what holds the stuff a chest cannot, and what keeps a small kit from scattering. I hung racks in my own garage and in two friends' shops, loaded them with the handles that actually live on a shop wall, and watched what happened when the rack had to grip a plastic broom handle, a wooden mop handle, and a metal pole in the same row.
The things I check on a wall rack: whether the grips hold a handle without you having to jam it in, whether the mount plate spreads the load across more than one fastener, whether the hardware in the box is worth using, and whether the whole thing stays level after a month of daily pulls. The things I check on a case-based kit: whether the molded slots actually hold tools when the case is carried by the handle, whether the latch stays shut when you pick it up by one end, and whether you can see at a glance that something is missing. That last one matters more than people think. A case that shows you the empty slot is doing more for your organization than any label maker.
I do not trust weight ratings printed on a box. I trust what happens when a real handle gets yanked out of a real grip on a real wall.
The two pieces you need before you start
You cannot organize a wall you have not prepped, and you cannot keep small tools together without a case that gives each one a home. Here is the short list, one rack and one kit.
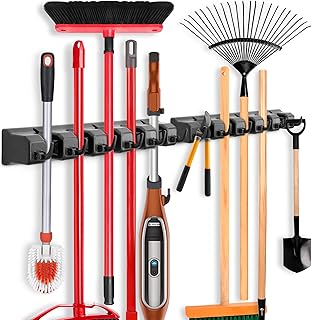
The wall rack: IMILLET 2 Pack Mop and Broom Holder, Wall Mount Organizer Storage Tool Rack
 Visit on Amazon →
Check current Amazon price. This is the piece that clears your floor. Two racks in the pack, each with a row of spring-loaded grips that clamp down on a handle when you push it in and hold it when you pull it out. That mechanism is the whole product, and it is the reason this works where a plain hook does not. A hook needs you to aim. A grip lets you shove a broom in with one hand while you are holding something else in the other.
I have one row holding a push broom, a mop, and a squeegee, and a second row holding extension poles and a pry bar that never had a home before. The plastic grips have not chewed through a wooden handle yet, and the mount plate spans enough distance that the rack does not twist when you pull a handle out at an angle.
Flaws but not dealbreakers: The included hardware is the weak point. Bring your own screws long enough to bite into a stud, and if you are mounting to masonry, bring anchors rated for it. The grips also do not care what you put in them, which means a heavy tool bag hung from one grip will sag the whole rack. This is for handles, not for weight.
Anyone with a garage wall and a floor they are tired of tripping over should start here. If you only have one or two long handles, one rack in the pack does the job and the second one can go in a closet or a laundry room.
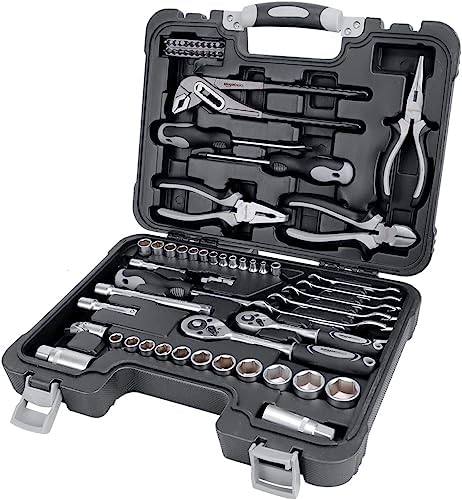
The starter kit: Amazon Basics 65-Piece General Household Home Repair and Mechanic's Hand Tool Kit Set with Storage Case, Portable, Non-Slip Handles, Black
 Visit on Amazon →
Check current Amazon price. This is the kit I hand to people who just bought their first house and own exactly one screwdriver, which is also a butter knife. Sixty-five pieces in a molded case means every socket, bit, and wrench has a slot, and a slot is a memory aid. When you open the case and a slot is empty, you know you left something under the sink before you close the lid and walk away.
The case is the point here, not the tool count. A loose pile of the same tools in a drawer turns into a scavenger hunt every time you need a 10mm, and I have watched an apprentice lose three 10mm sockets in one week because there was no case and no slot telling him something was missing. The non-slip handles are a real benefit when your hands are greasy, and the case latches shut well enough to carry it by the handle from the bench to the job.
Flaws but not dealbreakers: This is a household and light mechanic set, not a pro set you hand down to your kid. It covers the fasteners you meet in a house, not the ones you meet on a diesel engine. Treat it as the kit that lives in the hall closet or on a shelf over the bench, and add real tools as specific jobs demand them.
Anyone setting up a first apartment, a first house, or a garage that currently has no tools at all will get years of use out of this before they outgrow it.
The actual setup, step by step
Now the part you came for. This works on drywall, plywood, or block, and it takes an afternoon.
Step one: pick the wall by where you stand, not by what looks good. The rack goes beside the bench, at the end you already walk past when you finish a job. If you have to cross the garage to hang a broom, the broom lands on the floor. Storage that is convenient only in theory is storage you will stop using by week three.
Step two: find the studs and mark them with tape. Knock, or use a stud finder, and put a strip of painter's tape down each stud line so you can see them while you hold the rack up. Long-handled tools generate a lot of leverage when someone yanks one out, so real wood is the target. Hollow-wall anchors are for light stuff only, and even then use ones rated well above what you plan to hang.
Step three: decide heights before you drill anything. Long handles go high, out of the way of your head, and short daily-use items go at chest height where you can reach them without ducking. Leave the top of the wall for the stuff you use twice a year, and keep the space between the bench and shoulder height for the tools you touch every day.
Step four: mount the rack level, with two people if it is long. Hold it up, check level, mark through the plate, pilot drill, then drive screws that actually reach the stud. Snug them down evenly, working from the middle outward so the plate does not bow. Before you load it, check that the grips are not jammed closed from shipping.
Step five: load the heaviest handle first, over a stud. Get the big stuff in and hanging before you fill the gaps. That tells you whether the rack is solid while you can still move it.
Step six: give the kit a permanent home at the same height as the rack. A shelf over the bench, or a spot on the wall, but always the same spot. A case that migrates is a case that gets opened, emptied onto the bench, and forgotten. If the case lives in one place, the tools go back in one place.
Step seven: apply the ten-second rule. If putting a tool away takes longer than ten seconds, the storage is wrong, not the person. Move the hook. Add a grip. The habit follows the layout, not the other way around.
Step eight: audit the wall after a month. Look at the bench and the floor. Whatever is piling up there is what needs a home next. That pile is your shopping list, and it is more honest than any plan you draw before you start.
Where people get this wrong
The most common mistake is mounting the rack where the wall is empty instead of where the work happens. An empty wall at the far end of the garage stays empty because nobody walks over there with a broom in hand.
The second mistake is trusting the hardware in the box. Manufacturer screws are usually short and usually fine for a picture frame. Buy a box of construction screws sized for your wall and use those instead.
The third mistake is treating a case-based kit as a permanent solution. It is a starting point. The kit handles the household fasteners, and as you take on bigger jobs you add real tools and a real box for them. What you keep from the kit is the habit of a slot for every tool.
And the last one: hanging things on a rack that were never meant to hang. A loaded tool bag on a broom grip, a coil of extension cord on a grip meant for a handle, a five-gallon bucket on a hook. The rack is a handle holder. Respect that and it will outlast the wall it is screwed to.
The systems that lost this comparison
Modular systems like Milwaukee Packout and DeWalt ToughSystem are great, and I recommend them constantly, but they solve a different problem. They are for moving tools between a truck and a job site, and they cost real money per box. If your tools never leave the garage, you do not need a stacking system, you need a wall.
A traditional chest is the other half of the answer, and it is not what this guide covers. Husky's 52-inch chest is the best value for a home mechanic, Craftsman's 2000-series is the honest budget option, and both belong in a chest buying guide. Resin cabinets are fine for garden supplies, but they are not tool storage no matter what the box says.
For this project, the wall rack and the case are the right tools. Everything else is a different article.
What this all costs
Check current Amazon price on the rack and the kit, and budget a few dollars for proper screws and anchors. That is the whole project. You are not buying a chest here, you are buying back your floor and your bench, and the math on that is easy because the alternative is replacing the tools you keep losing.
The rack holds the long handles that never fit anywhere. The kit holds the small tools in slots that tell you when something is missing. The steps are the part that makes both of them work, and the steps are free.
Hang it where you stand. Give every tool a home. Then let the layout do the work of keeping them there.